Sunday, January 29, 2012

Winter Vacation: Trees in South Carolina

We made home safely a few hours ago.  I just couldn't wait to get on here and talk about my trip.  It was such a relaxing (and much needed) get-away to one of the most beautiful places this side of Heaven, I'm sure!  If you've never visited the "lowcountry" islands of SC, please do!  It's like taking a step back in time... a true reflection of God's beauty.  As a family, we have vacationed in the mountains, at lakes, and at the beach. Yet, I have never had an experience like this past week at Edisto Island, with trips to James Island, Johns Island, and Hunting Island.  I'm going to share some of my pictures, but trust me- they do not do justice to these spectacular places!
I took these on the first day we arrived on Edisto Beach.  Our condo was located on the marsh side of the island, but near the corner where the river and ocean met.  The only stores on the island were a convenient/gas station, 2 locally owned craft/gift shops, and a Piggly Wiggly.   
To say it is a small island would be a great understatement.  To me, this only added to the charm.  
The locals have worked very hard to maintain the laid-back, quiet town living of the island.  And, in January, you can walk along the beach for hours and have the only footprints in the sand!  


Hi, my name's Amanda and I'm a tree-aholic.  I LOVE trees.  And, I certainly got my fix this week!  The live oaks growing down in coastal South Carolina amazed me.  The first picture here was taken on Jungle Road, Edisto Island.  The second (my favorite of all my pictures) was taken on Botany Bay Road, just past the Allen AME Church and Cemetery.  And, the third oak was on Eddington Beach Road.  Every where I looked, I saw trees I wanted to photograph.  But, after 330 pictures, I thought about slowing down.
But, then we went to Johns Island...


This is "Angel Oak."  She is beautiful!  And, she is magnificent!


She is 300-400 years old.  65 ft. high, 25.5 ft around, and provides 17,000 sq. ft. of shade.
I love this tree!!!  I took many, many pictures. 

These were a few more of my favorite trees.  In all my visits to the beach, I had never seen trees growing in the water.  (I know, it's the little things that get me!)  I fell in love with the beach and trees at Botany Bay.

Apparently, it's custom to hang some of the pretty shells in the trees. 
 As to not disrespect their custom, I had a great time decorating beach trees with seashells.


I promise to tell about more of my vacation than about the trees.  

This is odd, but one of Mom's favorite pictures.  I have to admit, it's one of mine too.

I took this while on one of our "tree hunting" trips.  It was on Point of Pines Road.  I had just finished reading the history of the island (And I'm Glad: An Oral History of Edisto Island), and this house gave me a chill.  We passed it on the way up the road and Mom said, "We need a picture of that!"  I told her I was just thinking the same thing.  And, it turned out to be one of our favorites.  
I'm sure you'll hear more about the history of this place, as I am still so excited about the experience!

The beach was lovely!  And, I'll have more pictures :)
I also have enough drift wood from the beach to make a cool little project, so I'll post some pics of that as it goes.  But, for now, I'm thankful to have made it home safely with some time to spend with my boys... this was my first vacation without them in FOREVER and I've missed them terribly.

I am very thankful that I was blessed with wonderful weather, gorgeous scenery,  history lessons, safe travel, and quality time with my mom and dad.  They are the world's greatest.

Sunday, January 15, 2012

Scrapbook Paper Wall Art

The Harrison household has been under the weather.  I haven't felt well enough to do a lot of projects this past week.  And, I've tried to devote any time I felt well to taking care of my loves who have also been ill.  So, not much to post about!  

I did just finish some super delicious and high calorie Lemon Drop cupcakes.  Will is in a weight loss contest with his employees.  He asked if I could help him out by making a big fat fattening cupcake for each of his competitors.  I'm not sure that it's cheating, but I sure do feel guilty!  He says it's all just part of the competition.  He and I were good, we didn't try them.  David and his friend, Joey, said the were really good, though.  Wishing Will all kinds of luck with his weight loss.  And, hoping I benefit from his drive.

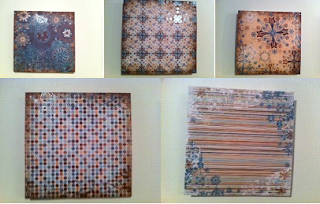
Oh, there was one other little project I finished over the weekend... my wall art for the bedroom.  I found some absolutely beautiful scrapbook paper in colors that compliment the decor of my room.  I've seen tons of  different pins on Pinterest for making wall art out of scrapbook paper, so I gave it a try.  

Here's the close up of each paper:

I glued each sheet to cardboard.  I've seen blogs suggesting you use canvas, shoe box lids, and foam.  The boys had friends over Friday night leaving me with empty pizza boxes.  Cleaned them up and glued scrapbook paper them.

This is what they look like side by side on my wall:

Very inexpensive and I like how it turned out!  I'd like to add a second row.  I'm sure I'll have another opportunity with our Friday night pizza routine.

Hope you all have had a very blessed weekend!

Sunday, January 8, 2012

Paper Rose Wreath

I took another picture of the paper rose wreath with Will's phone.  It takes better pictures :)


It has taken me what seems like FOREVER, but I finally finished my paper roses to make a wreath for above the bed.  The funny thing... after I finished, I wanted it for the fireplace in the living room and had to make another, more simply designed one, for the bed.


This is how it started.  I bought an old book at Goodwill for 50 cents, tore out 3 pages at a time and cut them into spirals.  Then, I rolled them up to look like roses (starting with outside of the spiral and rolling inward), and glued them on a foam wreath.  IT TAKES SO MANY ROSES!

This is the finished product hanging on the fire place.
  I put it there just to see how it looked and then decided it should stay.

When I still needed something for above the bed, I decided on a much more simple design.  One rose was all that I needed to roll for this one (instead of rolling roses every night for a week).  Cone shapes are much easier to make.  And, I think it's kinda cute, too!

The rest of my weekend has been spent taking down Christmas decorations, cleaning house, and trying to pass this crazy kidney stone.  Hoping it's gone soon!!!

Wednesday, January 4, 2012

Saving Candles

Short little project while I was fixing dinner tonight... saving my old candles.

I'm a candle-holic.  I love them!  They're in every room of our house.  Until they burn down so low that I can't reach to light them anymore.  I have found the solution!

1 glass vase

a long wick

old jar candles 
(melted in kettle of boiling water)

Pour melted candle into vase with wick placed in it.
Wait for each one to set before adding another.
This is from 4 left over candles.  I have more to add.  But, I already like how it looks!

That's it for me tonight.  Good night, everyone.  Warm wishes for a great evening :)

Tuesday, January 3, 2012

Homemade Cleaning Stuff

I did an article in our newsletter at work talking about the laundry detergent and Febreze I've been making at home to save money.  I found the "recipes" through Pinterest and love the blogs I found in the process.  There are others that I've tried since then.  Although my kids think I'm crazy, I'm having a blast making stuff.  And, you would be amazed at how much I've saved!

I've gotten a lot of feedback from co-workers.  Several have tried the recipes from the newsletter.  So, I thought I'd share them on here, too.  And, some of the others I found.

First, the laundry detergent...
This is by far my biggest money-saver.  I've tried several, but this is my favorite.  I found this one at http://whynotsew.blogspot.com/2010/08/how-to-make-homemade-laundry-detergent.html
It's pretty easy to make, which is always a plus in my book.  Here's what you need:
1 bar of soap (I like Ivory, but whatever you want is fine)
1 cup of Borax
1 cup of Washing Soda
2 gallons of water
-- You just grate the soap into a large pot.  Add a gallon of water and cook until the soap dissolves.  Then, add the Borax and Washing Soda.  Bring it to a boil.  Then, turn it off and stir in another gallon of water.  After it cools, divide and pour into two gallon containers.

Second, the Febreze...
This comes from http://fakeitfrugal.blogspot.com/2011/07/fake-febreeze.html
And, it comes in super handy with the two dogs.  With only 3 ingredients, it's amazingly simple!
1/8 cup of your favorite fabric softener
2 Tablespoons of baking soda
-- Put those ingredients in an empty Febreze bottle.  Then, add enough water to fill the bottle.  Shake and you're done!

Third, dryer sheets...
I'm usually a Bounce Dryer Sheets kinda gal, but I had all that extra liquid fabric softener from the Febreze experiment.  So, one of the ladies I'm following on Pinterest had posted her dryer sheet alternative.  I tried it.  I love it.  You can find her description here:  http://www.onegoodthingbyjillee.com/2011/08/giving-bounce-dryer-sheets-bounce.html
She cut up some dish towels, put them in a container with liquid fabric softener, and sealed them up.  Anytime she needs one, she just grabs one out, squeezes the access, and tosses in the dryer.  When that load of laundry is dry, she drops it back in the container for the next time.  So convenient and keeps me from finding used dryer sheets all over the place.  (My boys do not know how to put them in the trash.)

Finally, my new favorite stain remover!!!  This one I didn't believe until I saw it with my own eyes.  It's what I was talking about in my previous post (the one I made Will and Logan come see).  Yesterday, David was home so I made him sit and watch me make the stain in his rug disappear, too!  This comes from Jill's blog, too:  http://www.onegoodthingbyjillee.com/2011/12/homemade-carpet-stain-removerno.html
white towel
spray bottle with equal parts ammonia and hot water
Iron on high (steam) setting
-- spray the stain with the ammonia/water.  Put a white towel over it.  Run the iron over the towel.  You will begin to see the steam pull the stain through the towel.  Too cool!  I have some pictures of a icky stain by my dresser in the bedroom.

Here it is... yuck.  I had just ran the vacuum and thought of the tip from the "One Good Thing" blog.  So, I took a picture.
This is after a few minutes of running the iron over the stain.  It steamed a bunch and the towel looked pretty bad, so I thought I had it.  But, I could still see some of the stain.
This was my final picture.  You can see where the carpet is wet in that area, but the ugly nasty is gone!  I was so excited, especially about the NO SCRUBBING part.

I'll try to remember to post more things I try on here as I find/try them.  I thought my blog was going to be all about recipes and crafty things, but these tips are too good not to share!